Let’s start with the basics. DNS stands for Domain Name System. It’s like the phone book of the internet. Whenever you type a website like google.com, DNS finds the real address (IP address) of that website and sends you there.
DNS is super important. Without it, websites won’t load properly. That’s why hackers target it. A DNS attack is when a bad person tries to mess with your DNS. They might redirect your users, crash your site, or steal data.
For example, in 2016, a big attack on Dyn DNS made many huge websites go offline—including Twitter, Netflix, and Reddit. So, in this blog, we’ll learn how to prevent DNS attacks yourself in simple, clear steps.
Common Types of DNS Attacks
Let’s go over some common ones:
- DNS Spoofing (or Cache Poisoning): Hacker gives a fake IP address to users. They think they’re visiting your site but land on a fake one.
- DNS Tunneling: Hacker hides data (like stolen info) inside DNS queries.
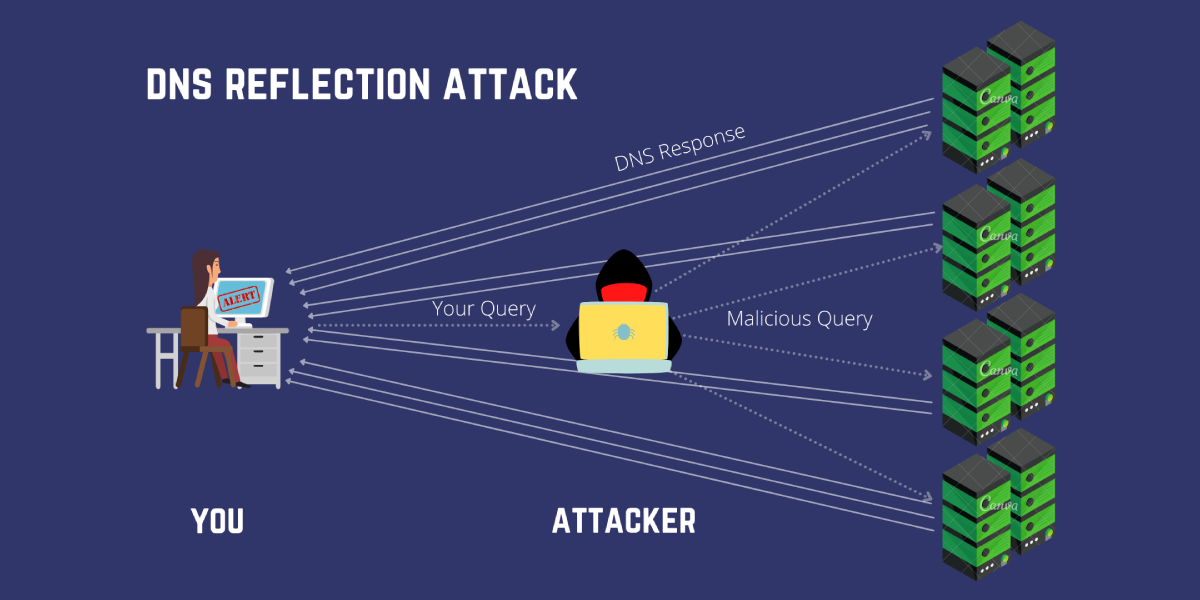
- DNS Amplification: They use DNS servers to flood your system with traffic and crash it.
- DNS Hijacking: Hacker takes control of your DNS and redirects your traffic.
- NXDOMAIN Attack: They send fake queries to non-existent domains to overload your DNS server.
- Domain Lock-Up: Hackers make your DNS server freeze by sending lots of requests that never finish.
- Phantom Domain Attack: They create fake domains that slow down your DNS responses.
How DNS Attacks Work

The hacker’s goal is to trick or overload your DNS server.
Here’s how a basic attack can work:
- Hacker sends fake DNS requests.
- DNS server believes it and gives wrong information.
- Users go to the wrong websites, or your server slows down.
- Hacker steals data or crashes your site.
It’s sneaky, but with the right steps, we can stop it.
Signs Your DNS is Under Attack

Here are warning signs you should watch for:
- Your website becomes very slow.
- You see a big spike in traffic for no reason.
- Users say they got redirected to strange websites.
- Latency increases (everything takes longer to load).
- Your DNS query logs show weird patterns or errors.
Step-by-Step Guide on How to Prevent DNS Attacks

Let’s now break it down into 10 easy steps for DNS attack prevention.
Step 1: Use a Reputable DNS Provider
Always pick a trusted and well-known DNS provider. Why? Because good DNS providers give you stronger protection and faster service. They’re less likely to go down during an attack.
Some of the best ones are Cloudflare (very fast and safe), Google DNS (very stable and simple), and OpenDNS (great if you want to control or block some websites). Using a trusted provider is your first line of defense.
Step 2: Enable DNSSEC (Domain Name System Security Extensions)
DNSSEC helps protect your website from fake DNS records. It adds a digital “signature” to your DNS info, so your visitors can trust it’s real and untouched.
To turn on DNSSEC, log in to your domain provider (like GoDaddy, Namecheap, etc.), find the DNSSEC setting, and switch it on. That’s it! It makes sure no one tampers with your DNS data while it’s being shared.
Step 3: Implement Rate Limiting on DNS Servers
Rate limiting means you control how many DNS requests your server allows per second. This is super helpful because attackers often try to overload your server with a flood of fake requests.
By setting a safe limit—like allowing 100 requests per second from the same IP—you can protect your server from crashing or slowing down during an attack.
Step 4: Use DNS Firewalls & Filtering Tools
A DNS firewall is like a guard dog for your DNS. It checks every DNS request and blocks the bad ones. This stops people from going to harmful websites.
For example, Quad9 is free and blocks malicious domains, and Cisco Umbrella is great for businesses that need stronger control. These tools help keep you and your users safe from dangerous websites.
Step 5: Apply Monitoring and Logging Tools
Always keep an eye on what’s happening with your DNS. Monitoring tools like Splunk, Nagios, Zabbix, and DNSviz let you watch DNS traffic in real-time.
You’ll know if something weird is happening, like sudden traffic spikes or unknown IP addresses trying to connect. This helps you catch problems early, before they turn into big attacks.
Step 6: Patch and Update DNS Servers
Hackers love old, unpatched software. That’s why updating your DNS software is so important. Every update fixes bugs or security holes. Try turning on auto-updates if you can. Also, follow a security checklist to make sure all your DNS settings are locked down and not open to attacks.
Step 7: Implement Redundancy and Failover Systems
Never rely on just one DNS server. If that one fails or gets attacked, your whole website can go offline. Set up multiple DNS servers in different locations.
Use load balancing to share traffic, and use Anycast networks so requests are always sent to the closest working server. This way, even if one server is down, others will still keep your site running.
Step 8: Restrict Zone Transfers (AXFR)
Zone transfers are used to copy all your DNS records to another server. But if this isn’t protected, hackers can steal your DNS data. That’s why it’s best to turn off zone transfers unless you really need them. If you do need it, allow it only from trusted IP addresses. This keeps your DNS records safe from being leaked.
Step 9: Use Encryption (DoT and DoH)
Normally, DNS requests are not encrypted. That means hackers can spy on or change your DNS traffic. To stop this, you can use DNS over TLS (DoT) or DNS over HTTPS (DoH).
These encrypt the traffic, just like a secure website does. For example, Firefox browser has DoH built in—you just turn it on in settings. Encryption adds a strong layer of privacy and safety.
Step 10: Use Intrusion Detection Systems (IDS)
IDS tools watch your DNS traffic and alert you when something suspicious happens. They can even block fake or harmful DNS traffic before it causes trouble. Tools like Snort and Suricata are great examples. They’re like alarms that go off when someone tries to break into your DNS systems.
Check out this must-read guide to learn all the important details about cybersecurity.
Real-Life Examples of DNS Attacks

Let’s show you some real-life examples of DNS attacks.
Dyn DNS Attack (2016)
In 2016, a big DDoS attack hit Dyn, a DNS provider. This made websites like Twitter, Netflix, and Spotify go offline for hours. It showed that even big companies can suffer if DNS isn’t protected.
Sea Turtle DNS Hijacking (2019)
In 2019, hackers changed DNS records of governments and telecoms to steal data. This attack proved how dangerous DNS hijacking can be and why DNSSEC is important.
Other Attacks
Google faced DNS spoofing attempts, and China used the Great Cannon to hijack traffic. These attacks show that DNS security is a global problem, not just local.
Also, want to learn how to prevent DDoS attacks, ransomware, cyberattacks, insider threats, and Man-in-the-Middle attacks? Check out these informative guides now!
DNS Security Tools & Services
Here are some tools you can explore:
| Tool/Service | What It Does |
| Cloudflare DNS | Fast, secure DNS + firewall |
| DNSCrypt | Encrypts DNS queries |
| dnstop | Tracks DNS traffic patterns |
| DNSviz | Analyzes DNSSEC configs |
| Splunk | Log management and alerts |
| BIND Settings | Secure DNS server configuration |
What to Do If Your DNS is Already Under Attack
If your DNS is already under attack, act fast—first, switch to a backup DNS provider if you have one. Then, check your DNS settings and records to see if anything was changed.
Block suspicious IPs, turn on DNSSEC if it’s not enabled, and start logging all DNS activity. Use security tools like firewalls and IDS to stop more damage. Finally, talk to your IT/security team or a trusted expert to help fix the problem and prevent future attacks.
At Bantech Cyber, we help keep hackers and online threats away from your business with our Managed Cyber Security Services. Our team watches over your systems all day, every day. We find problems early and stop attacks before they cause harm.
We protect your data and computers from hidden online dangers like DNS attacks, so you can run your business without stress.
Wrapping Up
So, coming to this point, we can hope that you now know how to prevent DNS attacks. DNS is like the backbone of your website, and if it’s attacked, everything can go wrong. But by following these 10 easy steps—like picking a good DNS provider, turning on DNSSEC, setting limits, monitoring traffic, and using security tools—you can keep your site safe. Make sure to check your DNS setup regularly to stay ahead of hackers and avoid problems.
In addition, here are some important blogs for easy guides in case you want to learn about XSS Attacks, Zero-Day Exploits, SQL Injection, and Malware Attacks!
